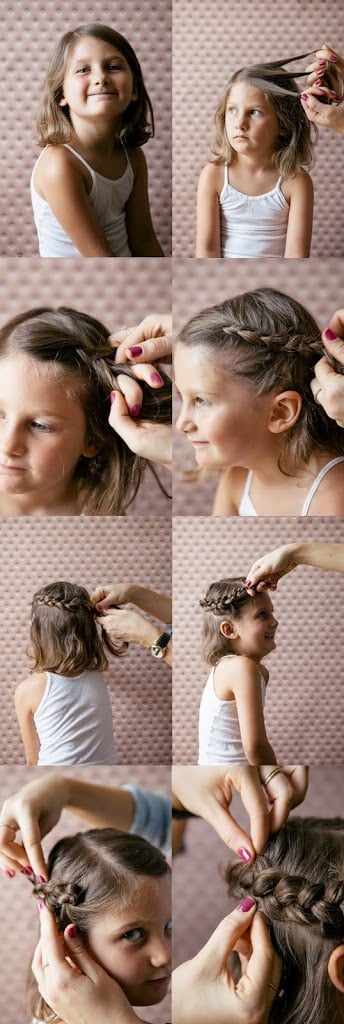
This month, I’m excited to feature back-to-school hair tutorials for girls every Monday. (And of course we grown-ups can wear them, too:) My friend Reagan of Hairdresser on Fire did a princess crown on adorable five-year-old Stella. What a pretty fall look, and I loved Stella’s goofy personality! Here are Reagan’s steps and more photos…
This style works for short, medium and long hair, and is a great way to keep your cutie’s hair out of her face!
Prep: Brush the hair until its tangle-free. You’ll need one elastic (I like Goody’s clear ones) and a handful of bobby pins.
1. Find the hair’s natural part. You’ll want to start your braid on the heavy side.
2. Start French braiding with the sections going underneath each other, instead of over the top. You’ll follow the round of the head, rather than going straight back like you would for pigtail braids.
3. To make the finished braid easier to manipulate, I like to only add hair to the French braid from the bottom section. (If this is too challenging or confusing, it’s optional.)
4-5. When you get to the back of the ear, you’ll start to cut across the back of the head, so that this is a “half up” braid instead of all the way up. You’ll leave the rest of the hair down.
6. When your braid reaches the other side of the head, and you have no more sections to add, finish off the tail of the braid and secure with an elastic.
7. Fold the tail of the braid in half and pin the braid in place. Find any loose areas and pin them too. The braid should look similar to a horseshoe.
8. Pull at the braid until it’s softened to your taste. I like my princess braids a little fuzzy. Now teach her how to jump rope to “Cinderella Dressed in Yella.” That seems suiting!
Thank you so much, Reagan!
P.S. More little girl hair tutorials, and grown-up hair tutorials…
(Photos by Alpha Smoot for A Cup of Jo. Hair by Reagan Baker. Styling by Kendra Smoot. Clothing credits: Necktie from Freshly Picked, polka-dot top and pants from Zara, vintage Keds high tops)
 PREVIOUS ARTICLE


